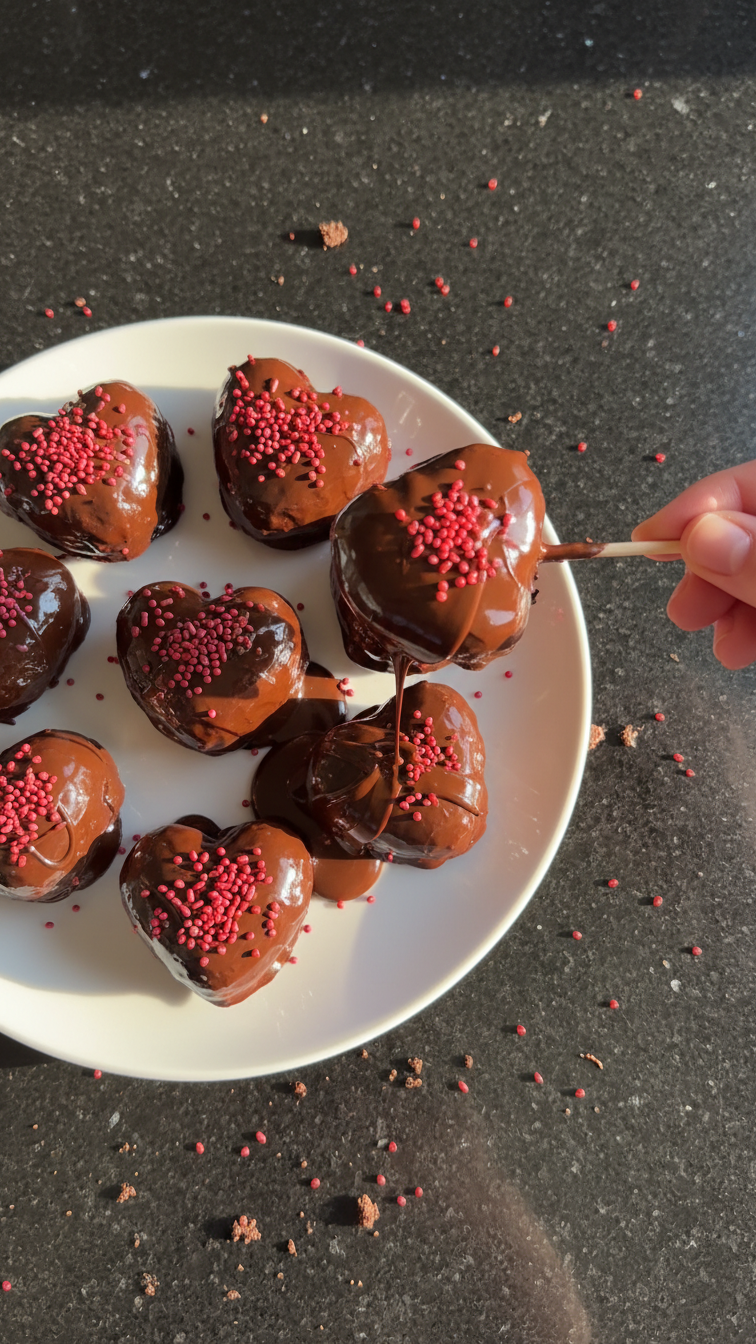
Chocolate Heart Cake Pops
Highlighted under: Cozy Dessert Classics
I absolutely love making these Chocolate Heart Cake Pops, especially for special occasions. They are a delightful treat that combines rich chocolate cake and creamy frosting, all wrapped in a delicious chocolate coating. Each bite is blissfully satisfying and perfect for sharing with loved ones. I enjoy adding my own twist by incorporating different flavors or sprinkles on the outside, making them not just delicious but also visually appealing. These cake pops are perfect for any celebration or as a sweet personal indulgence!
When I first made these Chocolate Heart Cake Pops, I was surprised by how simple yet enjoyable the process was. I baked the chocolate cake from scratch, which made all the difference in flavor. The key is to let the cake cool completely before crumbling it, ensuring the cake pops have a perfect texture. Each layer of chocolate coating adds richness, and the heart shape is always a winner for romantic occasions.
I remember one Valentine’s Day making a batch for my partner and his friends. They were a huge hit! The ability to customize the decorations, whether with colorful sprinkles or drizzled white chocolate, made them even more special. It's a wonderful way to show affection through food.
Why You'll Love This Recipe
- Rich chocolate flavor combined with festive heart shape
- Decadent frosting centers that contrast beautifully with the chocolate exterior
- Fun to make and perfect for parties or romantic occasions
Perfecting the Cake Texture
Achieving the perfect cake texture is crucial for your Chocolate Heart Cake Pops. To ensure moisture and richness, be precise with your measurements. Too much flour can lead to a dry cake, while insufficient cocoa powder may diminish the chocolate flavor. When mixing the wet and dry ingredients, avoid overmixing; just blend until smooth to prevent a dense texture. The batter should be thick yet pourable, and once baked, the cake should spring back when gently pressed.
Monitoring the baking time is equally important. Oven temperatures can vary, so check at the 18-minute mark. Insert a toothpick into the center; it should come out clean or with a few moist crumbs. If it comes out with wet batter, bake for an additional 1-2 minutes before checking again. Once removed from the oven, allow the cake to cool completely in the pan for at least 10 minutes before transferring to a wire rack. This helps maintain moisture.
Creating Ideal Cake Pops
When crumbling your cooled cake, I recommend using your hands to break it up gently into small, even pieces. This step is vital because larger chunks will not hold together well when mixed with frosting. Gradually incorporate the frosting, aiming for a consistency that allows you to shape the mixture without it crumbling apart. If the mixture is too wet, add a small amount of cake crumbs; if too dry, incorporate more frosting gradually until it binds.
Shaping the hearts can be a fun artistic process. To form a clean heart shape, press the mixture into heart molds or shape it by hand, utilizing your fingers to carve out a defined point at the bottom and a rounded top. The refrigeration step not only helps the sticks stay in place but also makes the cake pops easier to coat without melting the chocolate. Aim for at least 30 minutes of chilling time.
Decorating Your Cake Pops
When melting your chocolate candy coating, use a microwave or a double boiler for even melting. If using the microwave, heat in 30-second intervals, stirring in between until smooth and glossy. This method helps prevent overheating, which can cause the chocolate to seize. If the coating is too thick, you can thin it out slightly with a teaspoon of vegetable oil, leading to a smoother finish when you dip the cake pops.
Adding sprinkles or other decorations should be done quickly after dipping. The chocolate sets relatively fast, so have your decorations ready to sprinkle onto the coating before it hardens. If you want to vary the appearance, consider using colored candy melts or crushed nuts for added texture and flavor. For storage, keep your cake pops in an airtight container at room temperature for up to a week or freeze them for longer preservation.
Ingredients
For the Cake Pops
- 1 cup all-purpose flour
- 1/2 cup unsweetened cocoa powder
- 1 cup granulated sugar
- 1/2 teaspoon baking powder
- 1/2 teaspoon baking soda
- 1/4 teaspoon salt
- 1/2 cup buttermilk
- 1/4 cup vegetable oil
- 1 teaspoon vanilla extract
- 1 large egg
For the Decoration
- 8 oz chocolate candy coating
- Sprinkles or decorations of choice
- Lollipop sticks
Instructions
Prepare the Cake
Preheat your oven to 350°F (175°C). Grease and flour an 8-inch round cake pan. In a mixing bowl, combine the flour, cocoa powder, sugar, baking powder, baking soda, and salt. In another bowl, mix the buttermilk, vegetable oil, vanilla extract, and egg. Combine both mixtures and stir until smooth. Pour into the prepared pan and bake for 20 minutes or until a toothpick inserted comes out clean. Let cool completely.
Make Cake Pops
Crumble the cooled cake into a large mixing bowl. Add frosting (store-bought or homemade) a little at a time, mixing until the cake holds together. Shape the mixture into heart shapes. Insert lollipop sticks into each heart and place them in the refrigerator for at least 30 minutes to chill.
Coat the Cake Pops
Melt the chocolate candy coating according to package instructions. Dip each chilled cake heart into the melted chocolate, allowing excess to drip off. Quickly add sprinkles before the coating sets. Place upright in a foam block or a container to harden completely.
Serve and Enjoy
Once chocolate is set, your Chocolate Heart Cake Pops are ready to be served. They make delightful gifts or treats for parties. Enjoy!

Pro Tips
- For an added zing, consider adding a teaspoon of orange zest to the cake batter for a fresh twist.
Flavor Variations
You can put your own spin on Chocolate Heart Cake Pops by incorporating unique flavors into the cake. Consider adding espresso powder to amplify the chocolate richness or using almond extract instead of vanilla for a slightly nutty taste. For added decadence, mix in chocolate chips or crushed cookies to the batter before baking to introduce extra texture and flavor bursts.
Another fun way to enhance the pops is through the coating. Instead of using regular chocolate candy coating, try white chocolate or even a flavored coating like vanilla or strawberry. These variations not only offer a delightful taste contrast but also provide a vibrant visual appearance, especially when paired with coordinating sprinkles or toppings.
Storage and Serving Tips
Storing your Chocolate Heart Cake Pops properly is essential for maintaining their fresh taste and texture. If you've made a large batch, they can be stored in an airtight container at room temperature for several days. For longer storage, you may freeze them. Just ensure they are fully set before wrapping them individually in plastic wrap and placing them in a freezer-safe bag to prevent freezer burn.
When it comes to serving, these cake pops make an inviting centerpiece for any dessert table. To enhance their presentation, consider placing them in a decorative container filled with rice or floral foam. This not only elevates their appearance but also keeps them in place. If you’re preparing them for a party, arrange them in clusters for a visually appealing display.
Questions About Recipes
→ Can I use store-bought cake?
Absolutely! Using store-bought cake makes this recipe even quicker. Just crumble it as directed.
→ How long do these cake pops last?
When stored in an airtight container, they can last about a week in the refrigerator.
→ Can I customize the flavors?
Yes, feel free to experiment! You can add different extracts or flavored frosting for variety.
→ What can I use instead of lollipop sticks?
You can use pretzel sticks or even skip the sticks altogether and serve them in cupcake liners!
Chocolate Heart Cake Pops
Created by: The Globalbitesrecipes Team
Recipe Type: Cozy Dessert Classics
Skill Level: Intermediate
Final Quantity: 12 cake pops
What You'll Need
For the Cake Pops
- 1 cup all-purpose flour
- 1/2 cup unsweetened cocoa powder
- 1 cup granulated sugar
- 1/2 teaspoon baking powder
- 1/2 teaspoon baking soda
- 1/4 teaspoon salt
- 1/2 cup buttermilk
- 1/4 cup vegetable oil
- 1 teaspoon vanilla extract
- 1 large egg
For the Decoration
- 8 oz chocolate candy coating
- Sprinkles or decorations of choice
- Lollipop sticks
How-To Steps
Preheat your oven to 350°F (175°C). Grease and flour an 8-inch round cake pan. In a mixing bowl, combine the flour, cocoa powder, sugar, baking powder, baking soda, and salt. In another bowl, mix the buttermilk, vegetable oil, vanilla extract, and egg. Combine both mixtures and stir until smooth. Pour into the prepared pan and bake for 20 minutes or until a toothpick inserted comes out clean. Let cool completely.
Crumble the cooled cake into a large mixing bowl. Add frosting (store-bought or homemade) a little at a time, mixing until the cake holds together. Shape the mixture into heart shapes. Insert lollipop sticks into each heart and place them in the refrigerator for at least 30 minutes to chill.
Melt the chocolate candy coating according to package instructions. Dip each chilled cake heart into the melted chocolate, allowing excess to drip off. Quickly add sprinkles before the coating sets. Place upright in a foam block or a container to harden completely.
Once chocolate is set, your Chocolate Heart Cake Pops are ready to be served. They make delightful gifts or treats for parties. Enjoy!
Extra Tips
- For an added zing, consider adding a teaspoon of orange zest to the cake batter for a fresh twist.
Nutritional Breakdown (Per Serving)
- Calories: 320 kcal
- Total Fat: 18g
- Saturated Fat: 10g
- Cholesterol: 50mg
- Sodium: 70mg
- Total Carbohydrates: 36g
- Dietary Fiber: 2g
- Sugars: 25g
- Protein: 4g